Install kubefirst From the CLI
Using the CLI to create your cluster directly without using the UI is a perfect alternative for automation. The end result will be the same, a new production-ready management Kubernetes cluster, but you won't have access to the useful additional features available within the UI.
Prerequisites
kubefirst
- macOS & Linux (Homebrew)
- Linux (manually)
- Windows
If you are on macOS or Linux, and have Homebrew installed, you can run:
brew install kubefirst/tools/kubefirst
To upgrade an existing kubefirst CLI to the latest version run:
brew update
brew upgrade kubefirst
You can download the latest build for your architecture from the releases page. Once done, extract it, and ensure it's executable. You may need to use sudo for the tar or `chmod`` command.
tar --overwrite -xvf kubefirst_<VERSION>_linux_<ARCH>.tar.gz -C /usr/local/bin/ kubefirst && \
chmod +x /usr/local/bin/kubefirst
Now you can run kubefirst.
kubefirst version
We currenctly do not support Windows directly, but you can easily use kubefirst using WSL (tested with Ubuntu). To install the lastest WSL version, please follow the Microsoft documentation on how to install Linux on Windows.
Docker Desktop
Install Docker Desktop.
If you are a Windows user, you need to be sure to enable Docker support in WSL2 distros. More information in the Docker documentation.
Docker Resources Allocation
The more resources you give Docker, the faster your cluster creation will go, but here are the minimum requirements:
- CPU: 5 Cores
- Memory (RAM): 5 GB
- Swap: 1 GB
- Virtual Disk limit (for Docker images & containers): 10 GB
Civo Prerequisites
For kubefirst to be able to provision your Civo cloud resources:
- A Civo account in which you are an account owner.
- A publicly routable DNS.
- A Civo token.
kubefirst is keeping low the resources needed to create your Kubernetes cluster, but if you are already using Civo, note that you may have exceeding quota issues during the creation process.
Civo has a quota based on a combined allocation of instances/Kubernetes nodes, CPUs, RAM usage, and other resources. All customers start with a basic quota level, but you can request quota increase.
 GitHub
 GitLab
GitHub Prerequisites
- A GitHub organisation.
- A GitHub personal access token for your
kbotaccount.
Create your new kubefirst cluster
Adjust the following command with your GitHub and Civo tokens in addition to the appropriate values for your new platform.
export GITHUB_TOKEN=ghp_xxxxxxxxxxxxxxxx
export CIVO_TOKEN=xxxxxxxxxxxxxxxxxxxxxxxxxxxxxxxxxxxx

kubefirst civo create \
  --alerts-email yourdistro@your-company.io \
  --github-org your-github-org \
  --domain-name your-domain.io \
  --cluster-name kubefirst
By default kubefirst use the cloud providers to manage DNS. You also have the option to use Cloudflare.
To do so, add the dnsProvider flag with the value cloudflare to your create command —dnsProvider cloudflare.
You also need to set the CF_API_TOKEN environment variable with a Cloudflare token (export CF_API_TOKEN=xxxxxxxxx) having the Zone.Zone, and Zone.DNS edit permission. More information on Cloudflare token creation in their documentation.
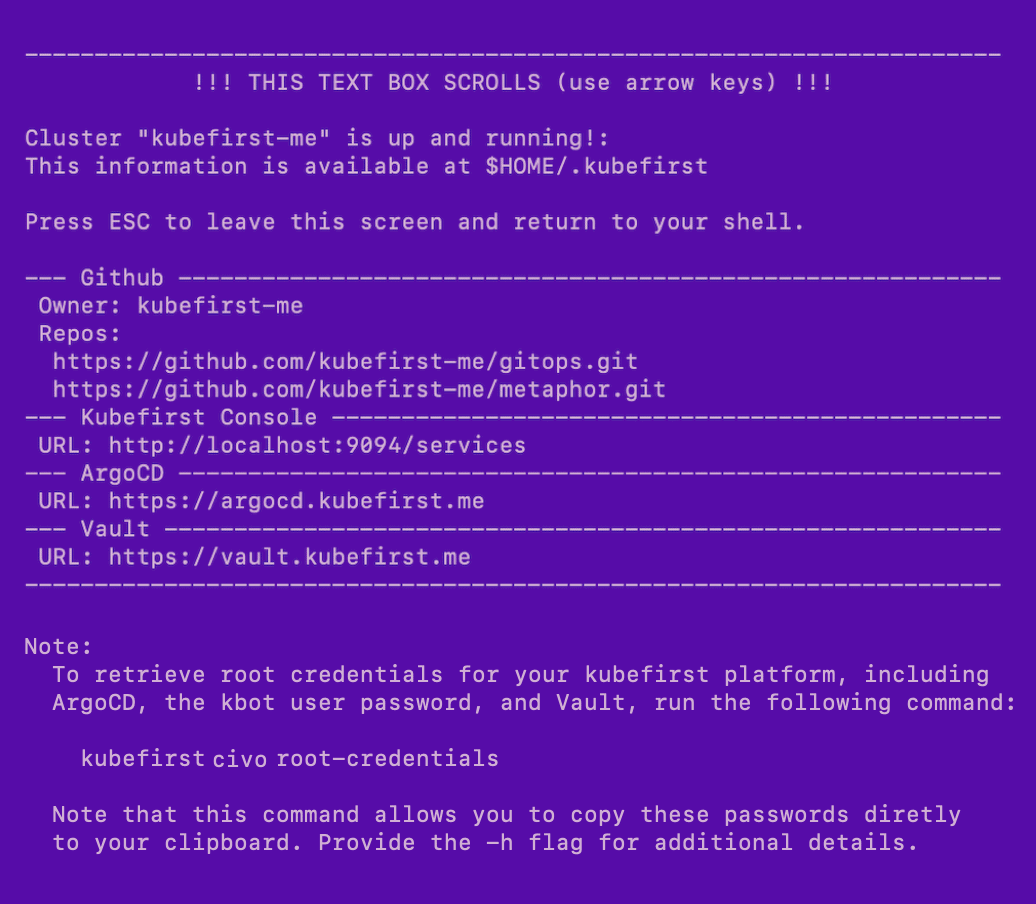
The kubefirst CLI will produce a directory of utilities, a state file, and some staged platform content that can now be found in the ~/.kubefirst and ~/.k1 folders on your local machine.
After the ~ 10 minute installation, your browser will launch a new tab to the kubefirst Console, which will help you navigate your new suite of tools running in your new Civo cluster.
If your deployment is not successful, errors and troubleshooting information will be stored in a local log file specified during the installation run.
Example of terminal output following cluster creation
GitLab
- Create or use an existing GitLab account.
- Create a GitLab group developer permissions.
- A GitLab personal access token for your
kbotaccount.
GitLab SaaS offering has limitations that require us to use groups contrary to GitHub which can be use without an organization.
If you want to use GitLab self-managed, you can update your GitOps repository and Kubernetes cluster once the creation is done following this tutorial.
Create your new kubefirst cluster
Adjust the following command with your GitHub and Civo tokens in addition to the appropriate values for your new platform.
export GITLAB_TOKEN=glpat-xxxxxxxxxxxxxxxx
export CIVO_TOKEN=xxxxxxxxxxxxxxxxxxxxxxxxxxxxxxxxxxxx

kubefirst civo create \
  --alerts-email yourdistro@your-company.io \
  --git-provider gitlab \
  --gitlab-group your-fully-qualified-gitlab-group/or-sub-group  \
  --domain-name your-domain.io \
  --cluster-name kubefirst
By default kubefirst use the cloud providers to manage DNS. You also have the option to use Cloudflare.
To do so, add the dnsProvider flag with the value cloudflare to your create command —dnsProvider cloudflare.
You also need to set the CF_API_TOKEN environment variable with a Cloudflare token (export CF_API_TOKEN=xxxxxxxxx) having the Zone.Zone, and Zone.DNS edit permission. More information on Cloudflare token creation in their documentation.
The kubefirst CLI will produce a directory of utilities, a state file, and some staged platform content that can now be found in the ~/.kubefirst and ~/.k1 folders on your local machine.
After the ~ 10 minute installation, your browser will launch a new tab to the kubefirst Console, which will help you navigate your new suite of tools running in your new Civo cluster.
If your deployment is not successful, errors and troubleshooting information will be stored in a local log file specified during the installation run.
Example of terminal output following cluster creation

Root credentials
To obtain your 3 initial passwords, run
kubefirst civo root-credentials

If you created your cluster using the UI, or reset your kubefirst environment, you can still retrieve the root credentials (except the kbot user password, which you will have to find manually in Vault) using kubectl:
# Argo CD admin password
kubectl -n argocd get secret argocd-initial-admin-secret -o jsonpath="{.data.password}" | base64 -d

# Vault root token
kubectl -n vault get secret vault-unseal-secret -o jsonpath="{.data.root-token}" | base64 -d
Connecting to Kubernetes
To connect to your new Kubernetes cluster, run
export KUBECONFIG=~/.k1/kubeconfig
To view all cluster pods, run
kubectl get pods -A