Install kubefirst from the CLI
Prerequisites
kubefirst
- macOS & Linux (Homebrew)
- Linux (manually)
- Windows
If you are on macOS or Linux, and have Homebrew installed, you can run:
brew install kubefirst/tools/kubefirst
To upgrade an existing kubefirst CLI to the latest version run:
brew update
brew upgrade kubefirst
You can download the latest build for your architecture from the releases page. Once done, extract it, and ensure it's executable. You may need to use sudo for the tar or `chmod`` command.
tar --overwrite -xvf kubefirst_<VERSION>_linux_<ARCH>.tar.gz -C /usr/local/bin/ kubefirst && \
chmod +x /usr/local/bin/kubefirst
Now you can run kubefirst.
kubefirst version
We currenctly do not support Windows directly, but you can easily use kubefirst using WSL (tested with Ubuntu). To install the lastest WSL version, please follow the Microsoft documentation on how to install Linux on Windows.
Docker Desktop
Install Docker Desktop.
If you are a Windows user, you need to be sure to enable Docker support in WSL2 distros. More information in the Docker documentation.
Docker Resources Allocation
The more resources you give Docker, the faster your cluster creation will go, but here are the minimum requirements:
- CPU: 5 Cores
- Memory (RAM): 5 GB
- Swap: 1 GB
- Virtual Disk limit (for Docker images & containers): 10 GB
 GitHub
 GitLab
GitHub
Create or use an actual GitHub personal account
Install the CA (Certificate Authority) of mkcert in your trusted store
We use mkcert to generate local certificates and serve https with the Traefik Ingress Controller. During the installation, kubefirst generates these certificates and pushes them to Kubernetes as secrets to attach to Ingress resources.
To allow the applications running in your kubefirst platform in addition to your browser to trust the certificates generated by your kubefirst local install, you need to install the CA (Certificate Authority) of mkcert in your trusted store. To do so, follow these simple steps:
brew install mkcert
mkcert -install
This is not an optional step: the cluster creation will fail if you don't install the mkcert CA in your trusted store.
If you are using Firefox, you have one more step: you need to install the Network Security Services (NSS):
brew install nss
Additional steps for Windows with WSL
The certificate installed on your WSL distribution won't be propagated to the local system (Windows). If you want to access your k3d installation from your main OS without certification warning, you will need to add the certificate to your Windows Trusted Root Certification Authorities store. To do so, find the location of the store by running the following command in WLS:
mkcert -CAROOT
Now cd into that directory and run:
explorer.exe .
It will open Explorer in the current directory. Copy the full path, which should look like \\wsl.localhost\Ubuntu\root\.local\share\mkcert. Open PowerShell as an administrator, cd to the copied path, and run the following command:
certutil –addstore -enterprise –f "Root" .\rootCA.pem
Restart your browser, and you should be good to go.
Local Atlantis Executions (optional)
To install the k3d kubefirst platform with Atlantis wired up for automated terraform executions, you'll need to create an account with ngrok, and expose an ngrok auth token environment variable in your shell. This allows the github/gitlab servers to invoke the Atlantis webhook running in your cluster.
To sign up for an ngrok account in 1 click, visit https://dashboard.ngrok.com/signup
Once you've logged in, you can retrieve your ngrok auth token by visiting https://dashboard.ngrok.com/get-started/your-authtoken
Make this available by running the following in your shell before you execute your kubefirst k3d create command, replacing the xxxxxxxxxxxxxxxxxxxxx with your actual authtoken.
export NGROK_AUTHTOKEN=xxxxxxxxxxxxxxxxxxxxx
If you skip this step the platform will still operate just fine, you just won't have automated terraform plans and applies in your pull requests.
Working without SSH
If you need your kubefirst installation to avoid using SSH whenever possible, you can bypass SSH and kubefirst will configure itself, GitHub Actions, Argo CD, and your entire GitOps workflow to utilize HTTPS instead of SSH at all times.
Provide the flag --git-protocol https when building your k3d cluster and kubefirst will take care of the rest.
If you ever need to change this, you will need to rebuild the cluster or manually update the templates in your gitops repository.
Create your new local cluster
To create a new kubefirst cluster locally, run
kubefirst k3d create
Details about your execution will be logged to your ~/.k1/logs directory. More information on kubefirst k3d, including optional flags, can be discovered by running kubefirst k3d help.
We are able to create an ephemeral GitHub token that expires after 8 hours using a process that will prompt your browser to request access to your account. If you need a quick environment, this is a frictionless approach. However, if you need this environment for longer than 8 hours, which is probably the case, please follow our GitHub Token Guide and export a more permanent token to your terminal by using the following command:
export GITHUB_TOKEN=ghp_xxxxxxxx
The kubefirst CLI will produce a directory of utilities, a state file, and some staged platform content that can now be found in the ~/.kubefirst and ~/.k1 folders on your local machine.
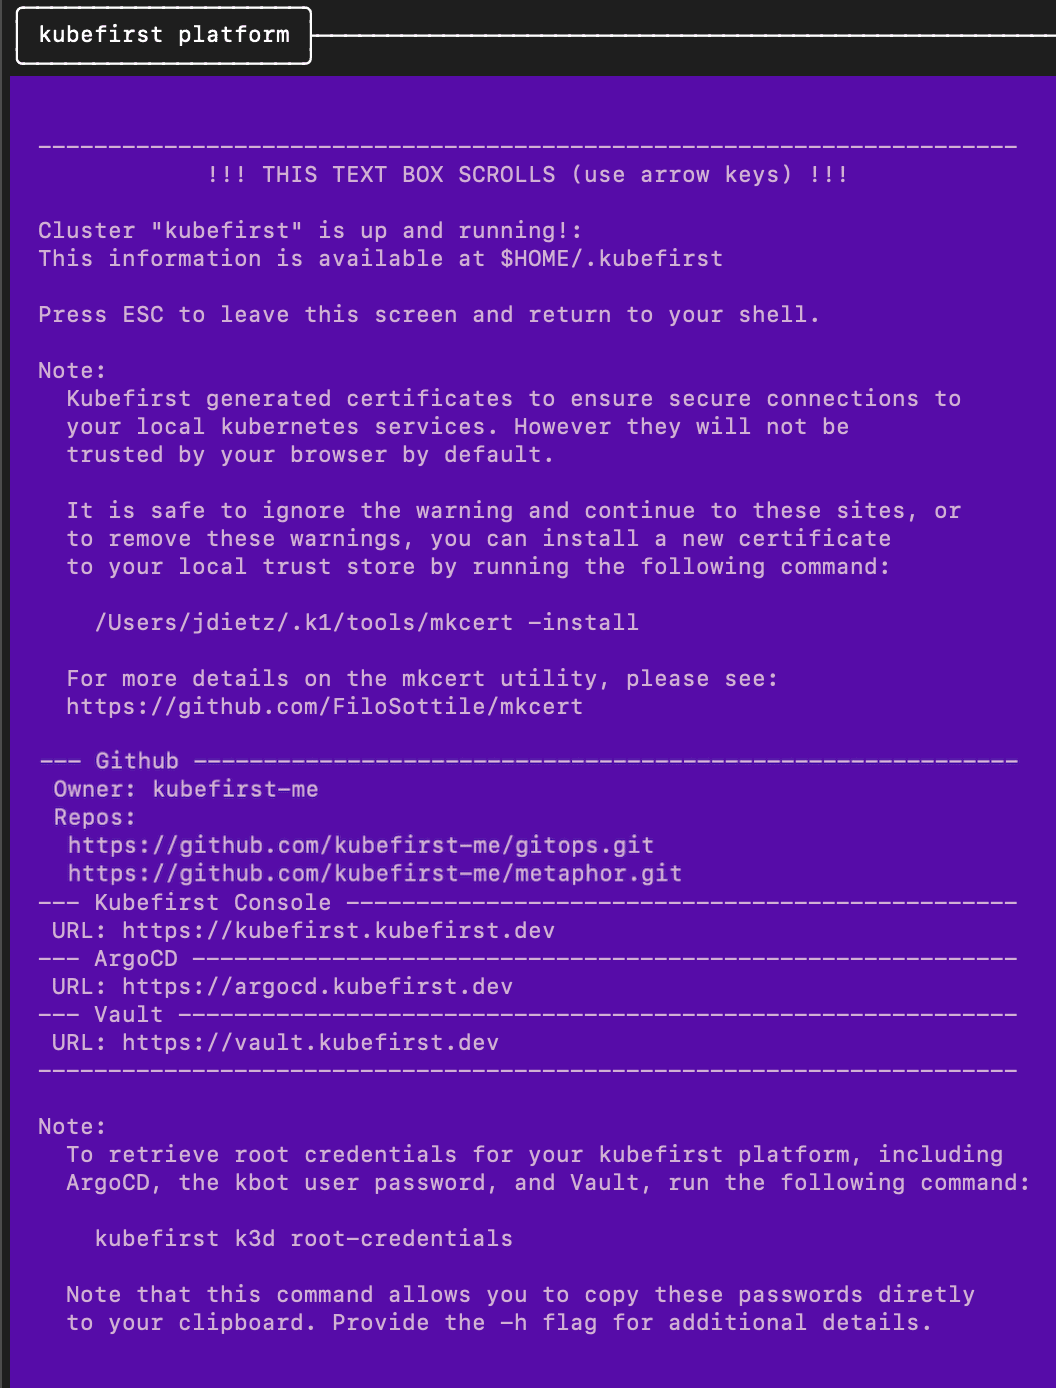
After the ~ 7 minute installation, your browser will launch a new tab to the kubefirst Console, which will help you navigate your new suite of tools running in your new k3d cluster.
If your deployment is not successful, errors and troubleshooting information will be stored in a local log file specified during the installation run.
Example of terminal output following cluster creation
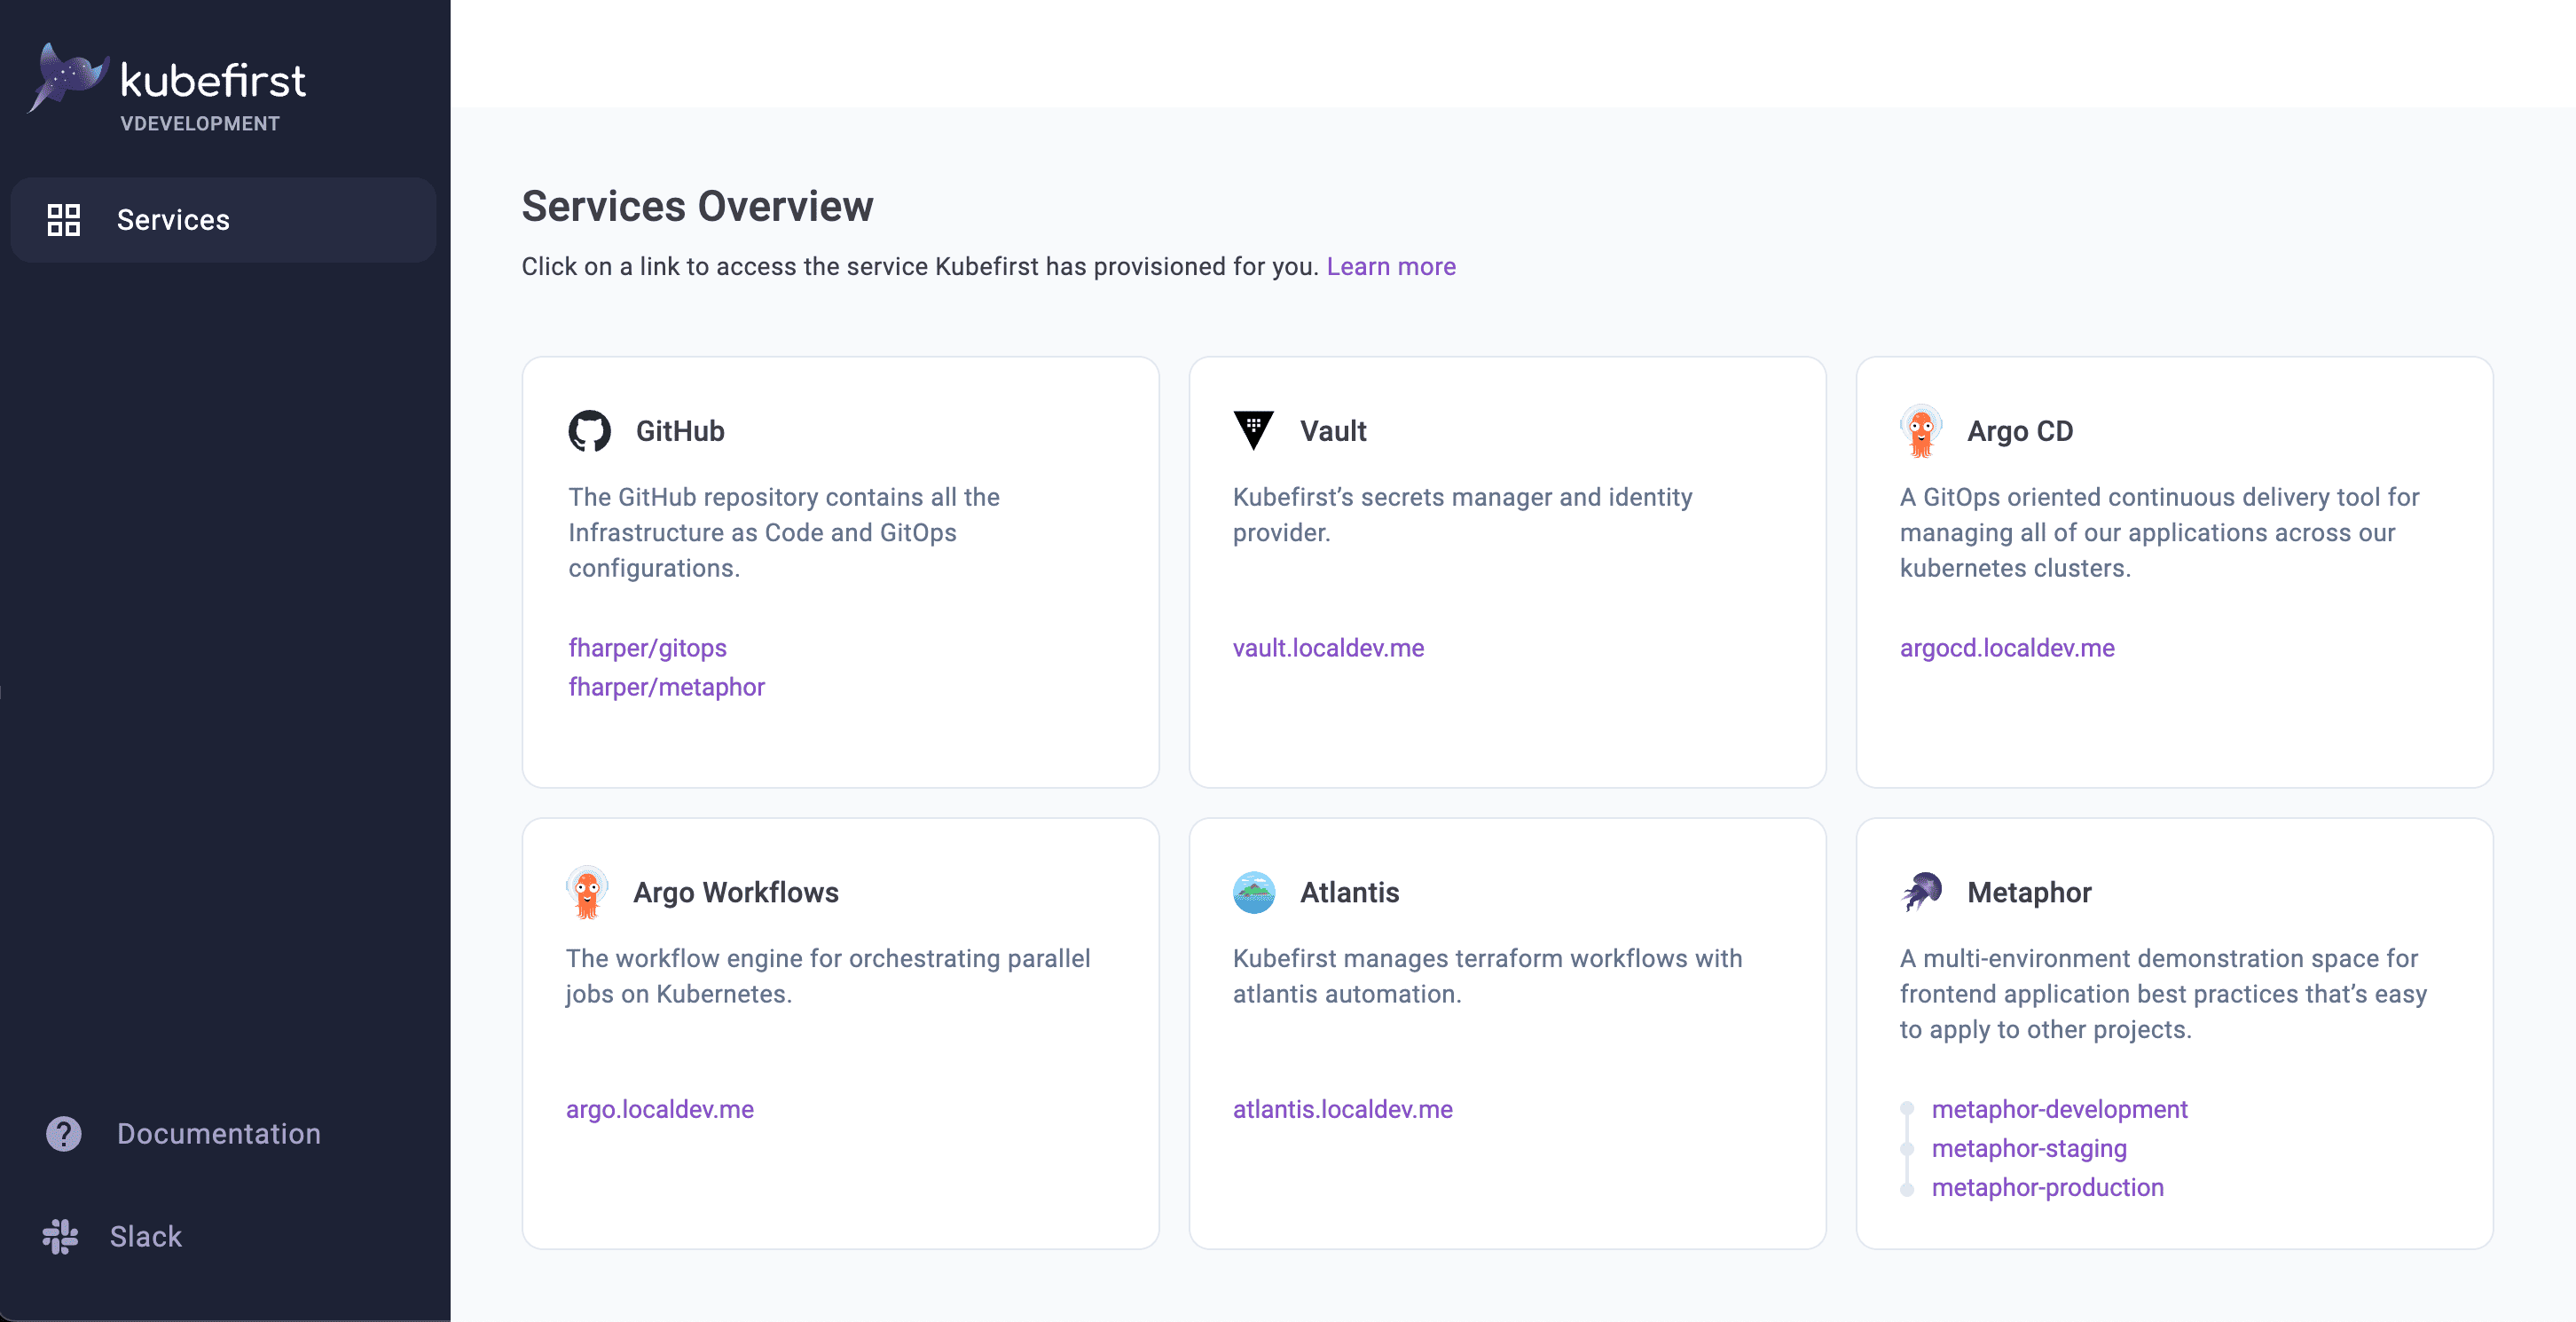
Installed Applications
To see what is installed by kubefirst, check the overview page.
Console UI Screen
Root credentials
To obtain your 3 initial passwords, run
kubefirst k3d root-credentials

If you created your cluster using the UI, or reset your kubefirst environment, you can still retrieve the root credentials (except the kbot user password, which you will have to find manually in Vault) using kubectl:
# Argo CD admin password
kubectl -n argocd get secret argocd-initial-admin-secret -o jsonpath="{.data.password}" | base64 -d

# Vault root token
kubectl -n vault get secret vault-unseal-secret -o jsonpath="{.data.root-token}" | base64 -d
Connecting to Kubernetes
You will be automatically connected to your new Kubernetes cluster. To view all cluster pods, run
kubectl get pods -A
GitLab
- Create or use an existing GitLab account.
- Create a GitLab group developer permissions.
GitLab SaaS offering has limitations that require us to use groups contrary to GitHub which can be use without an organization.
Install the CA (Certificate Authority) of mkcert in your trusted store
We use mkcert to generate local certificates and serve https with the Traefik Ingress Controller. During the installation, kubefirst generates these certificates and pushes them to Kubernetes as secrets to attach to Ingress resources.
To allow the applications running in your kubefirst platform in addition to your browser to trust the certificates generated by your kubefirst local install, you need to install the CA (Certificate Authority) of mkcert in your trusted store. To do so, follow these simple steps:
brew install mkcert
mkcert -install
This is not an optional step: the cluster creation will fail if you don't install the mkcert CA in your trusted store.
If you are using Firefox, you have one more step: you need to install the Network Security Services (NSS):
brew install nss
Additional steps for Windows with WSL
The certificate installed on your WSL distribution won't be propagated to the local system (Windows). If you want to access your k3d installation from your main OS without certification warning, you will need to add the certificate to your Windows Trusted Root Certification Authorities store. To do so, find the location of the store by running the following command in WLS:
mkcert -CAROOT
Now cd into that directory and run:
explorer.exe .
It will open Explorer in the current directory. Copy the full path, which should look like \\wsl.localhost\Ubuntu\root\.local\share\mkcert. Open PowerShell as an administrator, cd to the copied path, and run the following command:
certutil –addstore -enterprise –f "Root" certutil –addstore -enterprise –f "Root" .\rootCA.pem
Restart your browser, and you should be good to go.
Local Atlantis Executions (optional)
To install the k3d kubefirst platform with Atlantis wired up for automated terraform executions, you'll need to create an account with ngrok, and expose an ngrok auth token environment variable in your shell. This allows the github/gitlab servers to invoke the Atlantis webhook running in your cluster.
To sign up for an ngrok account in 1 click, visit https://dashboard.ngrok.com/signup
Once you've logged in, you can retrieve your ngrok auth token by visiting https://dashboard.ngrok.com/get-started/your-authtoken
Make this available by running the following in your shell before you execute your kubefirst k3d create command, replacing the xxxxxxxxxxxxxxxxxxxxx with your actual authtoken.
export NGROK_AUTHTOKEN=xxxxxxxxxxxxxxxxxxxxx
If you skip this step the platform will still operate just fine, you just won't have automated terraform plans and applies in your merge requests.
Working without SSH
If you need your kubefirst installation to avoid using SSH whenever possible, you can bypass SSH and kubefirst will configure itself, GitHub Actions, Argo CD, and your entire GitOps workflow to utilize HTTPS instead of SSH at all times.
Provide the flag --git-protocol https when building your k3d cluster and kubefirst will take care of the rest.
If you ever need to change this, you will need to rebuild the cluster or manually update the templates in your gitops repository.
Create your new local cluster
To create a new kubefirst cluster locally, run
kubefirst k3d create \
  --git-provider gitlab \
  --gitlab-group your-group \
  --cluster-name kubefirst
Details about your execution will be logged to your ~/.k1/logs directory. More information on kubefirst k3d, including optional flags, can be discovered by running kubefirst k3d help.
We are able to create an ephemeral GitLab token that expires after 8 hours using a process that will prompt your browser to request access to your account. If you need a quick environment, this is a frictionless approach. However, if you need this environment for longer than 8 hours, which is probably the case, please follow our GitHub Token Guide and export a more permanent token to your terminal by using the following command:
export GITLAB_TOKEN=gl_xxxxxxxx
The kubefirst CLI will produce a directory of utilities, a state file, and some staged platform content that can now be found in the ~/.kubefirst and ~/.k1 folders on your local machine.
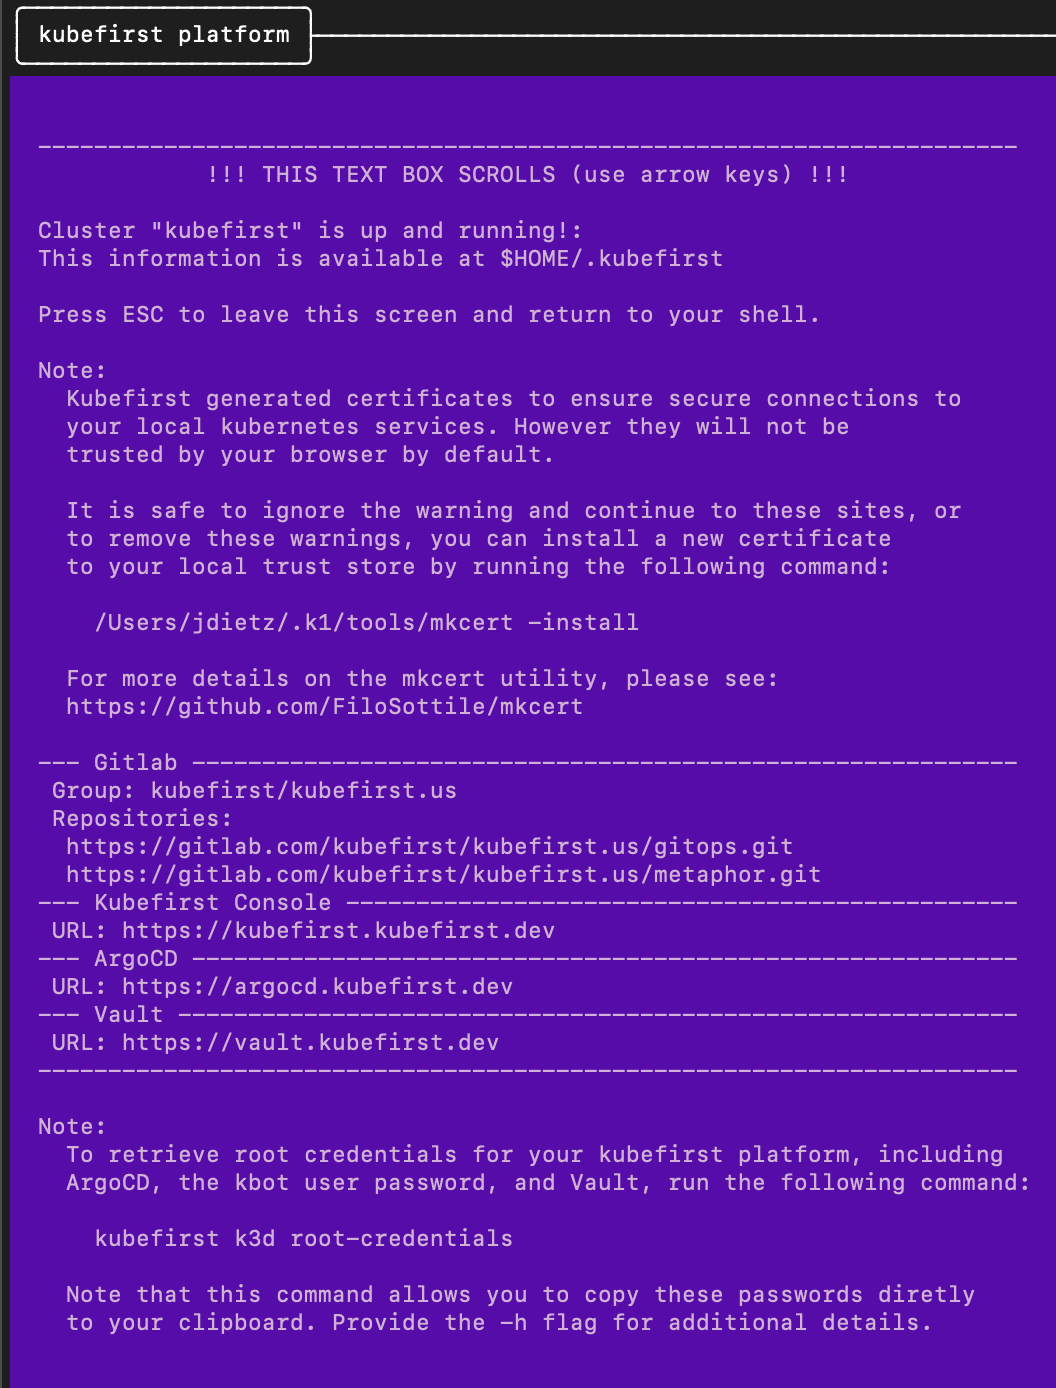
After the ~ 7 minute installation, your browser will launch a new tab to the kubefirst Console, which will help you navigate your new suite of tools running in your new k3d cluster.
If your deployment is not successful, errors and troubleshooting information will be stored in a local log file specified during the installation run.
Example of terminal output following cluster creation
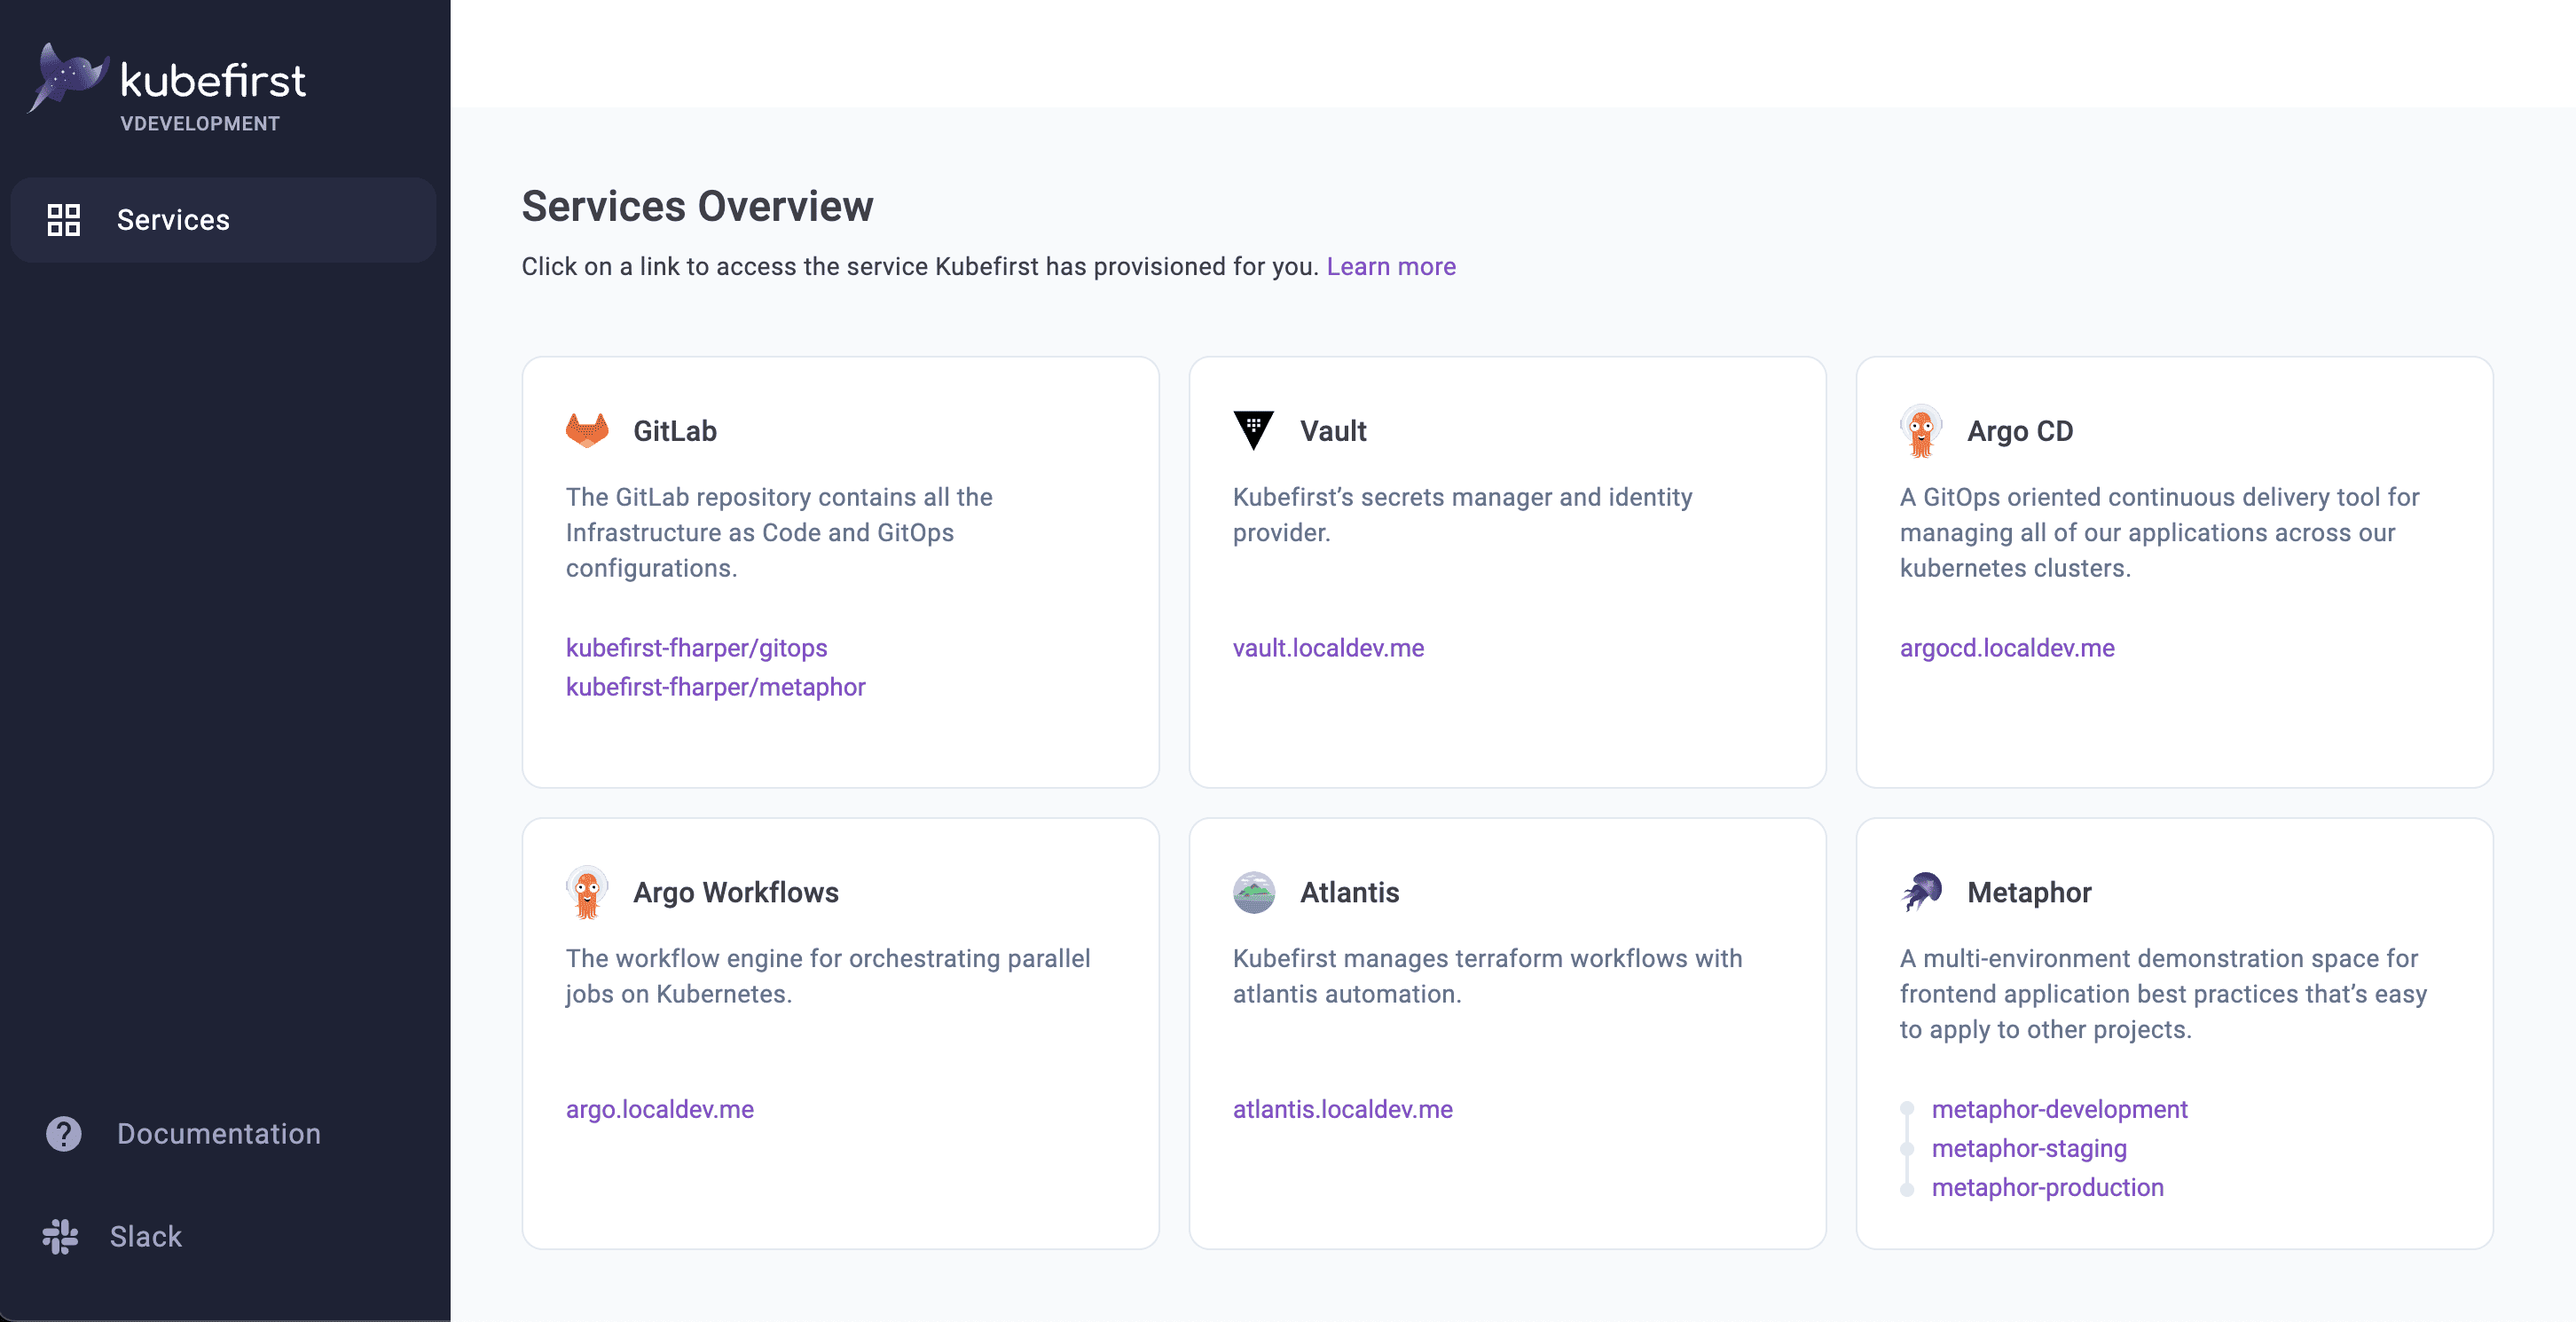
Installed Applications
To see what is installed by kubefirst, check the overview page.
Console UI Screen
Root credentials
To obtain your 3 initial passwords, run
kubefirst k3d root-credentials
If you created your cluster using the UI, or reset your kubefirst environment, you can still retrieve the root credentials (except the kbot user password, which you will have to find manually in Vault) using kubectl:
# Argo CD admin password
kubectl -n argocd get secret argocd-initial-admin-secret -o jsonpath="{.data.password}" | base64 -d

# Vault root token
kubectl -n vault get secret vault-unseal-secret -o jsonpath="{.data.root-token}" | base64 -d
Connecting to Kubernetes
You will be automatically connected to your new Kubernetes cluster. To view all cluster pods, run
kubectl get pods -A